DIY: 3-D Paper Snowflakes


The stomach flu is a cruel anatomical joke. It also isn't very inspiring...

So it's a good thing I had this idea BEFORE I came down with it. Paper snowflakes are a great craft for the recovering invalid. ;)

Also, they're super cheap.


What You Need:
- 6 squares of paper
- Tape
- Stapler
- Scissors
- Ribbon
- (pretty basic stuff, see.)

Do It!

You can start by squaring off regular old pieces of 8x10 printer paper if you want. . .However, the finished snowflake is almost 2 feet across, so feel free to cut your squares a little smaller.

(If you go big, though, it can make a dramatic star suspended above your Christmas Tree!)


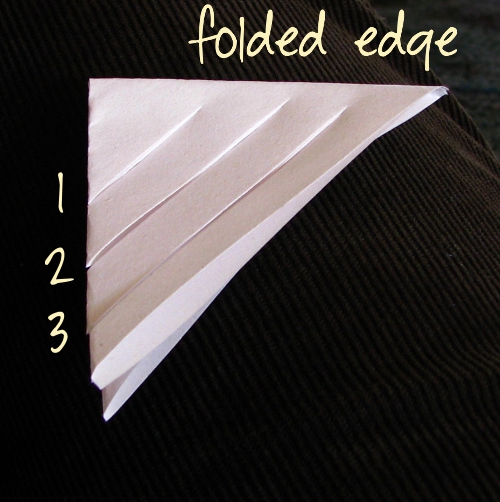
Fold one of your squares in half on the diagonal to make a triangle. Fold it in half again to make a smaller triangle. One of the edges will have a single fold, the next edge will have 2 folds, and the third will be loose.

Starting from the 2-fold side, make 3 equidistant snips towards the single fold side. Cut almost to the single fold, but not quite. These snips should be parallel to the loose side.


***
When you open it up, it should look like this. with 3 diamond-shaped snips radiating from the center.
***
Next, curl the innermost diamond into a ring and secure with tape. Like so.

***

Flip it over and join the second diamond.


***
Repeat with the last two diamonds so you end up with something that looks like this from the side. Really, you could stop right now and just put it on your tree if you wanted; it's pretty enough.
***
Make three more and then staple them together at one of the tips. You can also tape or staple them together where their edges touch to help them achieve the right shape. Here's half your snowflake. Now make the other half exactly the same way.

***
Staple the two halves together in the center. Voila! Now you can poke a hole in one of the points and put a ribbon through it.

***

I put three at varying lengths in front of a window. You could put miniature ones on a tree. . . Use as bows on wrapped gifts . . . They always get a good reaction, and nobody ever believes how easy they are to make!


Shared at:

Sumo's Sweet Stuff: Market Yourself Monday // Making the World Cuter // Creating My Way To Success: A-Round-Tuit // Sew Chatty: Made With Love Monday // Full Hands, Full Hearts: Season's Best Monthly Link-up // Under the Table and Dreaming: Sunday Showcase // Keeping it Simple: Motivate Me Monday // The Dedicated House: Make It Pretty Monday // Home Stories A to Z: Tutorials and Tips Party // Sugar Bee Crafts: Take A Look Tuesday // A Bowl Full of Lemons: One Project at a Time // Ginger Snap Crafts: Wow Me Wednesday // Practically Functional: The Fun in Functional // Centsational Girl: Holiday Home Link Party // Link Up With Me, Liz Marie // The Frugal Girls: Chic and Crafty Party! // It's a Hodgepodge Life: Hodgepodge Friday // Ladybird Lane: Weekend Show Off Party // The Thrifty Rebels: Winter Wonders and Holiday Happenings // Lovely Crafty Home: Lovely Crafty Weekend // Cedar Hill Ranch: Homespun Holidays // Healthy Mommy, Healthy Baby: Sweet Saturday // The Gingerbread Blog: Sweet Saturday // Too Much Time On My Hands: Get Schooled Saturday // Something Swanky: Sweet Treats and Swanky Stuff // Six Sisters: Strut Your Stuff // It's Overflowing: Overflowing with Creativity // Or So She Says: Your Great Idea // Nifty Thrifty Things: Nifty Thrifty Sunday // Project Inspire: Just Something I Whipped Up // A Blossoming Life: Frugal Crafty Home Hop // Today's Creative Blog: Get Your Craft On!  //


A Bowl Full of Lemons

Comments

Thank you so much for your tutorial. I was thinking of making something like that at the Christmas craft party I'm having in a few weeks. They are so pretty.
Kaysi said…
I love this!!!!!
Marissa Deen said…
Thanks Grace! :) Have fun!
What a beautiful idea! Looks like a lot of fun. I found your project next to mine at the Dedicated House link party. Megan
Cathie said…
I remember this from a Gibson Girl newsletter! (Never mind! I just checked and realised it went unpublished, lol)

These are my favourite to make! There's nothing quite like a big, 3-D snowflake to add beauty to a room in the winter.
That takes me back to childhood Christmas's how sweet. I must give the snowflake a try and make some Chinese lanterns too
Following you now
Janice
Marissa Deen said…
Sweet! I'll have to check out yours as well! :)
Marissa Deen said…
Yeah, I don't know where I picked this idea up. :) It was a few years ago. I must say, I DO remember the article you once did on quilling. It's something I've always wanted to try my hand at, but haven't gotten to it yet. . .
Marissa Deen said…
Thanks so much, Janice! :) I'll check out your blogs, too.
Anne Birdsong said…
Hi Marissa, I’m Anne from Life on the Funny Farm (http://annesfunnyfarm.blogspot.com), and I’m visiting from Make It Pretty Monday.

This is awesome! My kids have brought these home from school a couple times, but I never knew how to make them. Now I do! Sorry to hear about your stomach bug.

Anyway, thanks for posting this. If you’ve never visited yet, I hope you can pop by my blog sometime to say hi…
Marissa Deen said…
Will do, Anne! :) Thanks for stopping by!
Monica said…
I love these and this is a great tutorial! I am going to make some for a winter wonderland birthday I'm planning :) Thanks for sharing!
http://mommysordinarymagic.blogspot.com
HomeFor4 said…
oh! that snowflake is so cute! it just reminded me of the christmas lanterns back in the Philippines, that looks similar :)

dropping by from make it pretty monday, come and visit me back at:http://homefor4sweethome.blogspot.com/

huggies***
rea
Unknown said…
thank you so much for this! I've been looking for an easy tutorial for these for my girls!
my kids made great flat ones...but 3-D...even better! http://mommyishblog.blogspot.com
Ashley
I really like this tutorial. I am having ideas already on how I can use this. I like the suggestion of using this as a gift bow. I am visiting from Sugar Bee Craft's Take a Look Tuesday party.
Marissa Deen said…
Thanks, Rea, will do :)
Marissa Deen said…
Haha, thanks! I took great pains with this tutorial, trying to make it clear, because I found other tutorials weren't clear enough on where to make the cuts and it took me a bunch of tries to figure it out. :)
Jill said…
I used to love making simple paper snowflakes as a kid. These ones are gorgeous and very swanky! I'm pinning to try myself!

Thanks for linking to a Round Tuit!
Hope you have a fabulous week!
Jill @ Creating my way to Success
http://www.jembellish.blogspot.com/
So pretty! I made a few but not the 3D kind, never knew how to make them, but now I do! thanks for sharing :)
Angela said…
This is so pretty! My mom made some of these last year and swore they were so easy to make but that was hard to believe considering how stunning they turned out!
Marissa Deen said…
Thanks for visiting, Kristina. :) I jumped over to your blog, and must say, I love your header!
Unknown said…
I made a bunch of these last year. So fun!

Thanks for the reminder!

<3
Jessica said…
I love this, too! I'm going to try and make my own :)
Wow, those are super cool looking! I love how they're all twisted and stuff. :-) Thanks for sharing at The Fun In Functional!
Earning-My-Cape said…
This is sooo cool!!! I'm going to make these with my kids!!! I just showed them and they are all excited to make them! Thanks!
Noelle said…
how amazing are these! i'll have to make them with my sunday school kids! thank you for sharing :)
Marissa Deen said…
Thanks for visiting! :)
Marissa Deen said…
Thanks for visiting! :) I just subscribed to your blog--the corkboard idea's so cute!
Marissa Deen said…
Thanks so much for visiting, Jessi! :)
Marissa Deen said…
Thanks for visiting! :)
Marissa Deen said…
Thanks for visiting, Noelle! :)
Oh wow these look so easy and Cute! I will definitely have to try these out! :)
LilyWhite said…
Adorable! And frugal! Love it.

xoxo, Jordan
Unknown said…
Gah you make it look so easy! The kiddos and I will have to give this a try!
Carrie said…
Very cute and inexpensive Christmas decorating option! Thanks for sharing!
Valerie said…
Get.out.of.town! I love the look of these and your tutorial is awesome! Getting the white paper squared up and ready for my 8 and 6 year olds when they get out of school!!!

Blessings,
Valerie
I just noticed that you linked this up to the Winter Wonders & Holiday Happenings link party. I'm glad you did, it's totally awesome! Thanks for stopping by!
Anonymous said…
I would like to pin this to show my family and friends, Just simply wonderful. Thanks for sharing.
Unknown said…
AWesome! just what we needed to add a little x-mas cheer to our home
Marissa Deen said…
Thanks for visiting, Jessica! :)
Marissa Deen said…
Thanks for visiting, Becky! Your blog header is really cute. :)
Marissa Deen said…
Thanks for visiting! :)
Marissa Deen said…
Thanks, Valerie! Have fun :D
Marissa Deen said…
Feel free! :) Thanks so much for reading.
Anonymous said…
Love this idea. Just visiting from The Fun in Functional. I'll be sure to check back...